
If you’ve ever sunk your teeth into a slice of juicy smoked brisket, then you already know — this is the king of barbecue. Done right, a beef brisket delivers the kind of savory, smoky flavor that turns backyard cooks into legends.

Whether it’s your first time cooking brisket or your fiftieth, this guide gives you the best brisket method to get perfect results at home. We’re not leaning on gimmicks, overly technical computer code, or rigid temp rules. Instead, I’ll show you a better way — using feel, fire, and a little patience — to smoke a whole brisket with confidence.
Let’s talk tools, timing, trimming, and everything in between.
Table of Contents
- Why This Smoked Brisket Recipe Works
- Tools, Ingredients & Prep for Smoked Brisket
- JUST DROPPED.
- Choosing the Right Beef Brisket
- How to Trim Your Beef Brisket
- Seasoning and Binding the Brisket
- Double Wrap the smoked Brisket
- Resting the Brisket (Don’t Skip This)
- Slicing and Serving
- Leftovers and Storage
- A FINAL WORD ON BEEF BRISKET
- FAQs for Smoked Beef Brisket
- More Brisket
- HONEY INFUSED. FLAME PERFECTED.
- Smoked Brisket Recipe
This article was inspired by OTFC contributor Nick Hill of Salt & Fire BBQ.
Why This Smoked Brisket Recipe Works
There are hundreds of brisket recipes out there. Some are overly complicated, others are too simple to produce the results you want. This one hits the sweet spot — a simple recipe that delivers consistent texture, deep smoky flavor, and a bark you can knock on. It works on any setup, whether you’re cooking on an offset using indirect heat, a pellet grill, or a charcoal smoker loaded with dry wood and a few wood chips.
You’ll learn the entire process, including the best way to trim, season, smoke, rest, and slice your brisket based on real-world experience — not just a temperature probe number. I’ve cooked briskets in every style imaginable, from overnight long cooks on a drum to mid-day quick hits on a pellet smoker. The principles I walk you through here are built to flex with your gear, your heat source, and your personal preference.
And if you screw up your first brisket? That’s a rite of passage. Every pitmaster has been there.
Tools, Ingredients & Prep for Smoked Brisket
To do this right, you’ll need the right tools. A reliable meat thermometer or temperature probe is essential for checking the internal temperature of the meat. You’ll also need a sharp knife — ideally a boning or slicing knife — a sturdy cutting board, and a good roll of pink butcher paper. A small bowl for your dry rub mix and a spray bottle for your spritz will make things easier.
Start with a full packer brisket, which includes both the flat cut and the point. I prefer one in the 12- to 14-pound range. You’ll also need yellow mustard as a binder, kosher salt, 16-mesh coarse black pepper, and granulated garlic. Some folks also add garlic powder and onion powder to their rubs — both are solid additions if that fits your flavor profile.
For wrapping, I like to pour on warm tallow before sealing the beef brisket in butcher paper. And for spritzing, I go with a 50/50 mix of apple cider vinegar and water, though apple juice or even watered-down hot sauce can add an extra layer of flavor.
THE COWBOY COLLECTION
JUST DROPPED.
Cowboy butter brings rich, garlicky heat. Cowboy Candy brings sweet fire with a brown sugar kick. Both built to perform over the fire – just like we like it.
Choosing the Right Beef Brisket
Picking out a beef brisket isn’t just grabbing the biggest hunk of meat in the bin and calling it good. You’re about to spend the next 10–14 hours of your life with this piece of meat, so it’s worth taking a minute to choose the right one.
Now, not every little flaw is a dealbreaker — sometimes you sacrifice a slightly thinner flat to get better marbling, or overlook a rough trim job if the rest of the cut checks out. But once a brisket starts stacking up red flags? I put it back and keep digging.
And don’t be shy — ask the meat department if they’ve got more in the back. I’ve done it more times than I can count, even when there were five “perfectly good” briskets sitting right in front of me. Trust me, making friends with your butcher is one of the best moves you can make as a backyard pitmaster.

what To look for when choosing a brisket:
First, check the fat cap
- If the packer got a little wild with the blade and sliced too deep, exposing the meat beneath, it’s not ideal — especially when you’re aiming to keep moisture in during the cook. Then flip it over and check for marbling in the flat. You want to see white flecks running with the grain. No marbling in a choice brisket is common, but with Prime, it should at least be visible. Wagyu will have the most, though I personally find it a bit too rich for a long smoke.
Next, look at the flat
- Thickness matters. If the flat cut is too thin — less than an inch of muscle once you account for trimming — that meat is gonna dry out before it ever gets tender. You’ll also end up trimming off more than you should, which just wastes your money. I’m always hunting for the thickest, most even flat I can find.
The Bend Test
- Some folks say a bendy brisket equals a tender final product. Not quite. A floppy brisket might just mean it has a thinner fat cap or a smaller deckle. Or it could just mean looser muscle fibers. None of those automatically guarantees a better result. Still, it’s useful — if the brisket is super stiff, that probably means you’ll be trimming a ton of thick, dense fat and maybe dealing with a deckle that won’t render out. So yes, I still look for some pliability — but I use it as a guide, not gospel.
Lastly, don’t assume bigger is better!
- Some of the worst cooks I’ve had came from monster 18- to 20-pound briskets that were a pain to manage. I’ll take two well-shaped 12- to 14-pounders any day over one giant. You’ll get better airflow, better bark, and less waste.
How to Trim Your Beef Brisket
Start with cold meat straight from the fridge. Cold meat is easier to trim, and it helps you feel the difference between fat and muscle fibers. Place the brisket fat side down on a large cutting board and trim off any loose flaps of fat or thin meat that won’t cook evenly.

Round off the thin flat end until the remaining muscle is at least an inch thick — otherwise, that part will dry out. Trim the deckle fat carefully without cutting into the meat side. Then flip the brisket and tackle the fat cap side, trimming it down to a uniform quarter inch across the entire surface of the brisket. Think aerodynamic — you want smooth edges so air and smoke flow evenly across the meat during the smoking process.
If you see large bands of fat on the surface of the brisket that feel dense or solid, trim them down. Fatty side or not, thick fat doesn’t render well and will ruin your bark.
Seasoning and Binding the Brisket
Use yellow mustard as a binder. It helps your dry rub stick to the brisket and doesn’t affect the taste once cooked. If mustard’s not your thing, try olive oil, Worcestershire sauce, or hot sauce. That part is all personal preference.
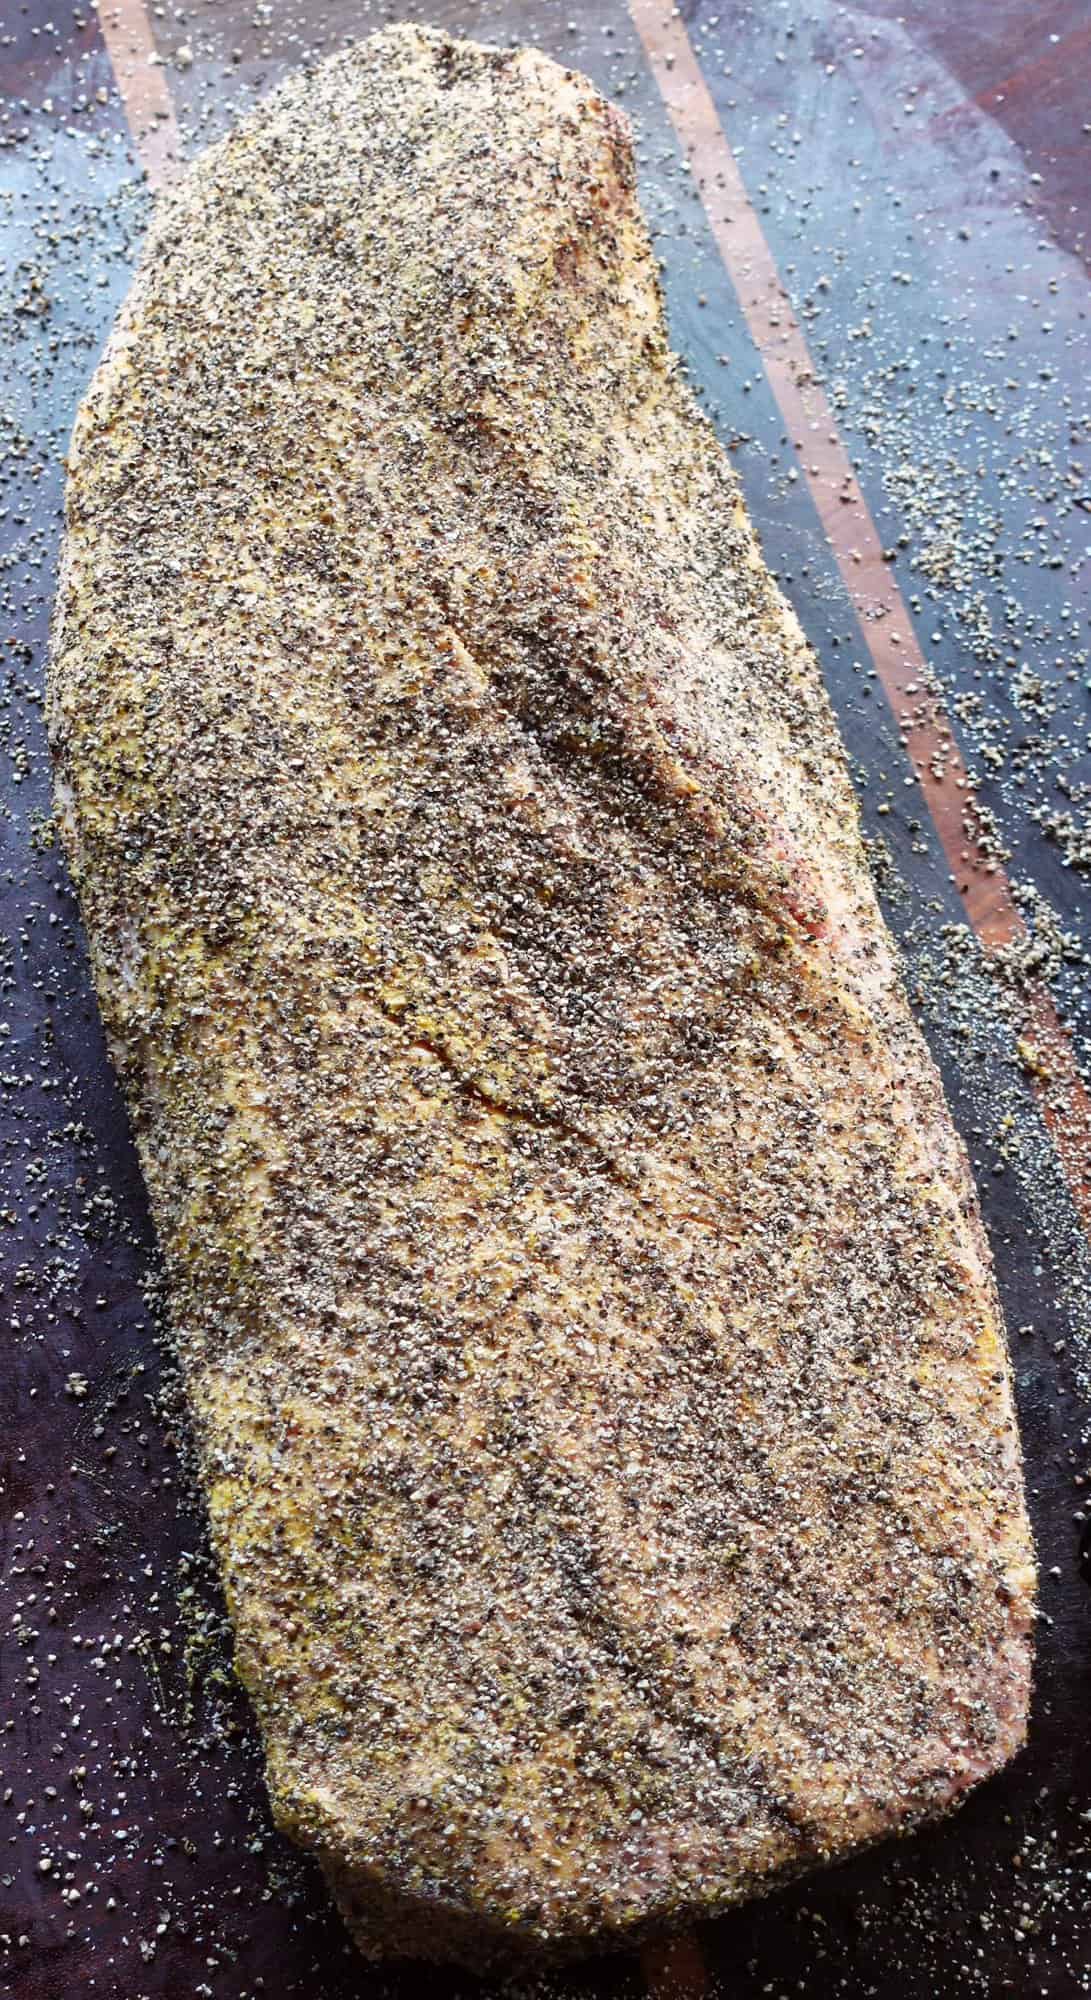
My dry rub is simple: kosher salt, coarse black pepper, and granulated garlic. You can also add garlic powder or onion powder if you want to round out the flavor. Some folks mix in a little brown sugar, but I skip it — sugar can burn during long cook times.
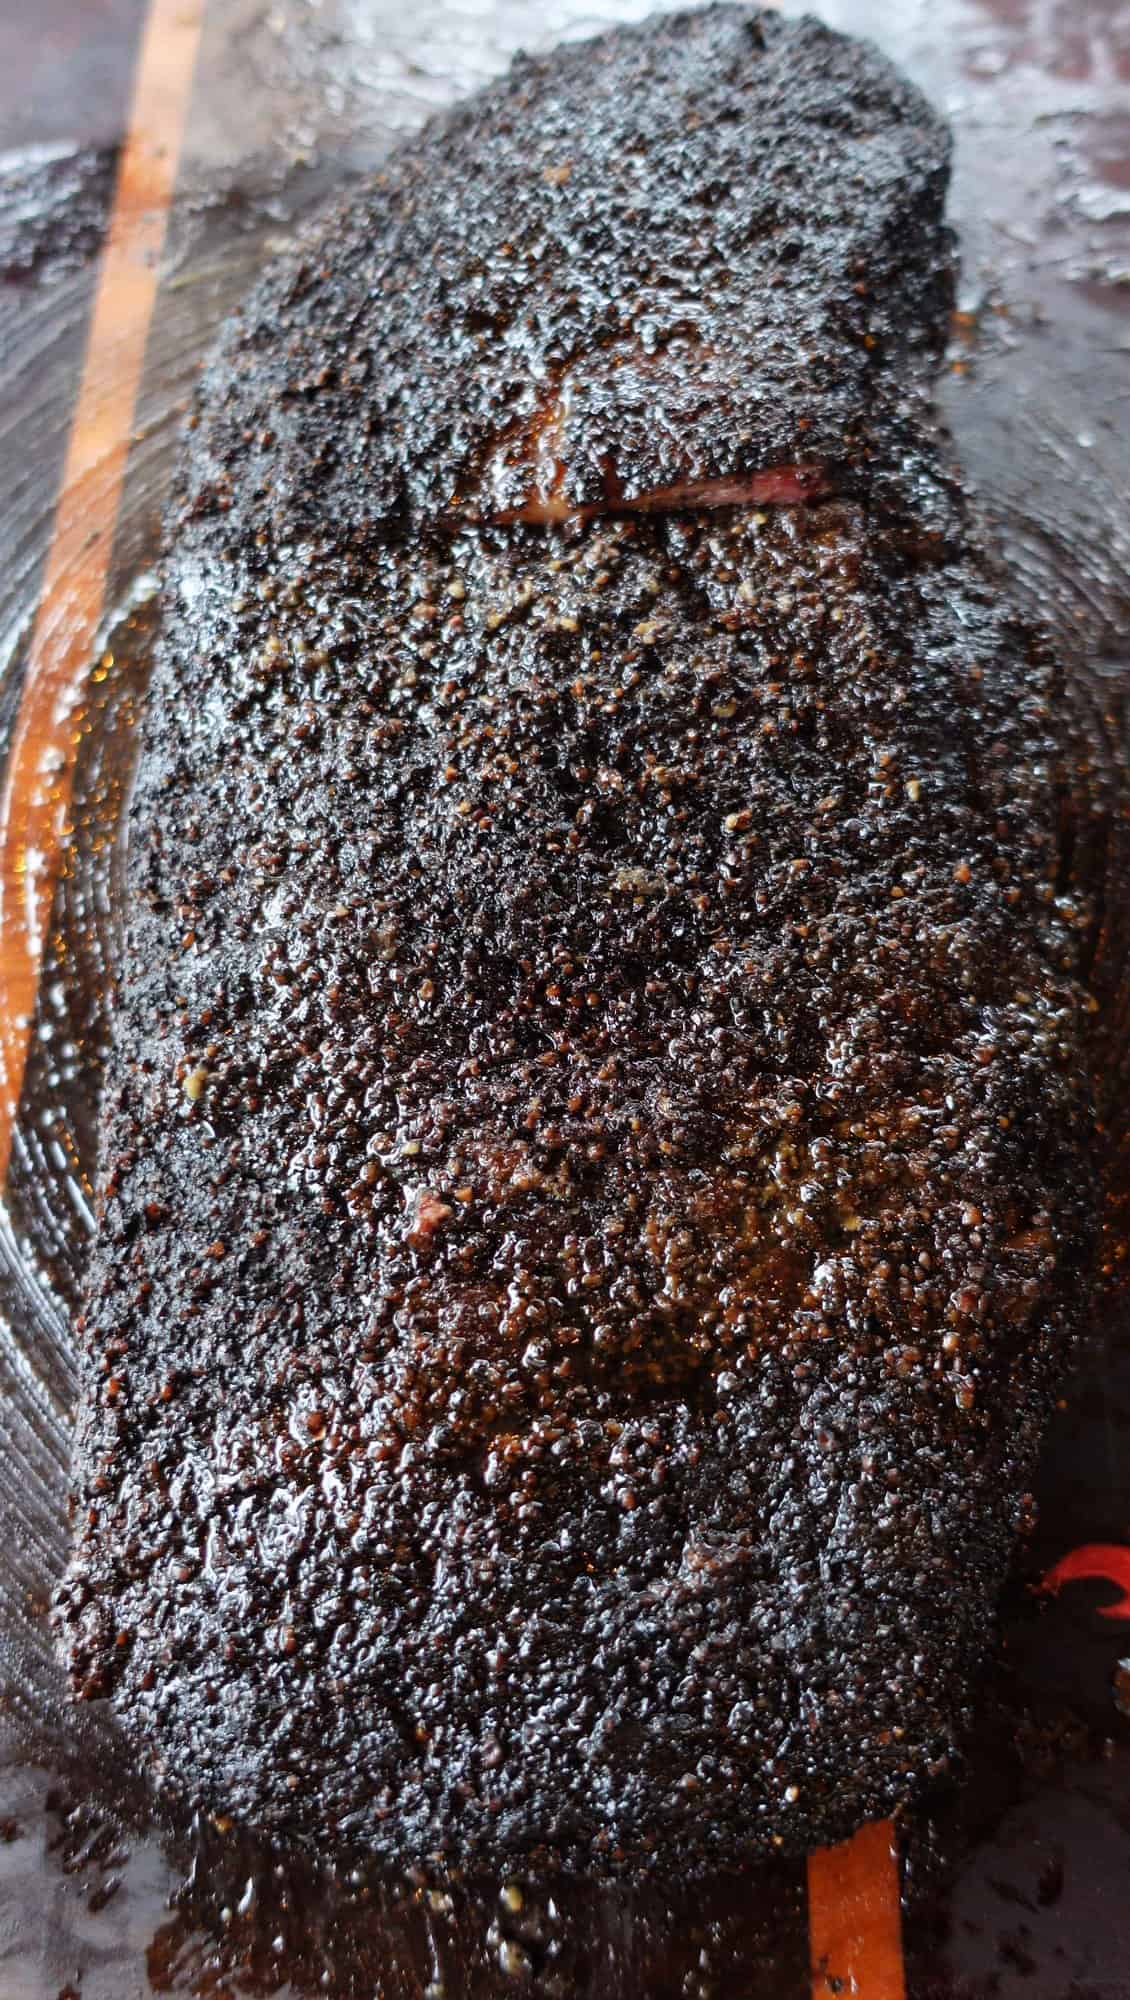
Mix your rub in a small bowl and apply it heavily to all sides of the brisket. Don’t be shy. You want the brisket to look like it’s wearing a pepper jacket.
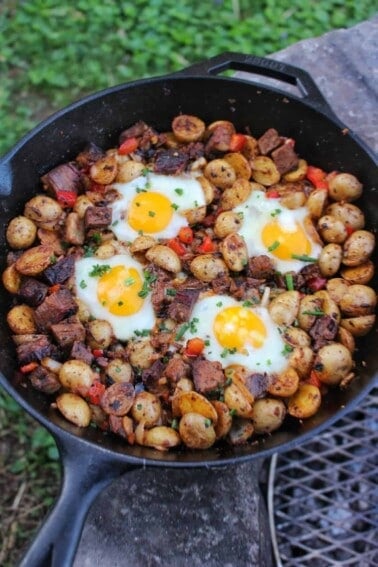
If you can’t eat the whole brisket at once, consider turning the leftovers into a Chopped Brisket Sandwich, Smoked Brisket Queso, BBQ Brisket Nachos, Smoked Texas Twinkies or Leftover Brisket Breakfast Skillet!
Smoking the Brisket
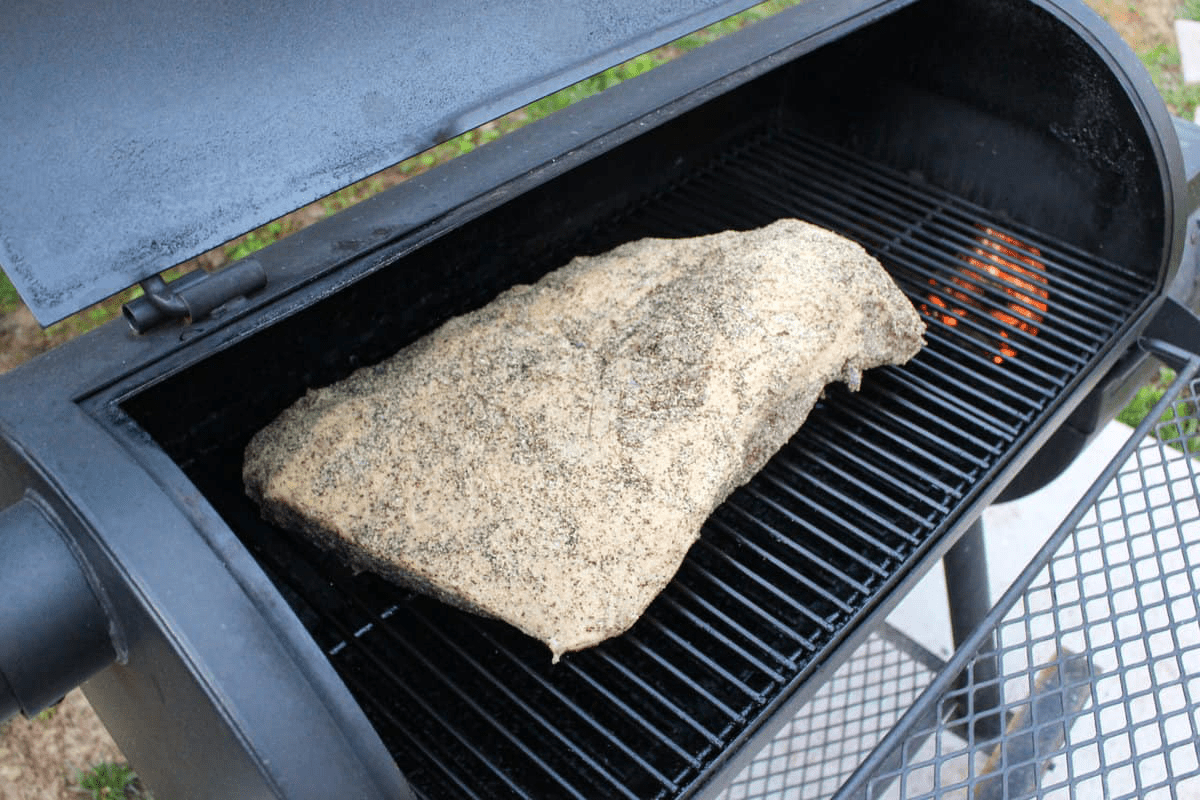
Preheat your smoker to 250 to 275 degrees Fahrenheit. Whether you’re using a pellet smoker or an offset rig with wood chips and dry wood, aim for indirect heat and steady airflow. Place the brisket fat cap up, with the point end toward the heat source.
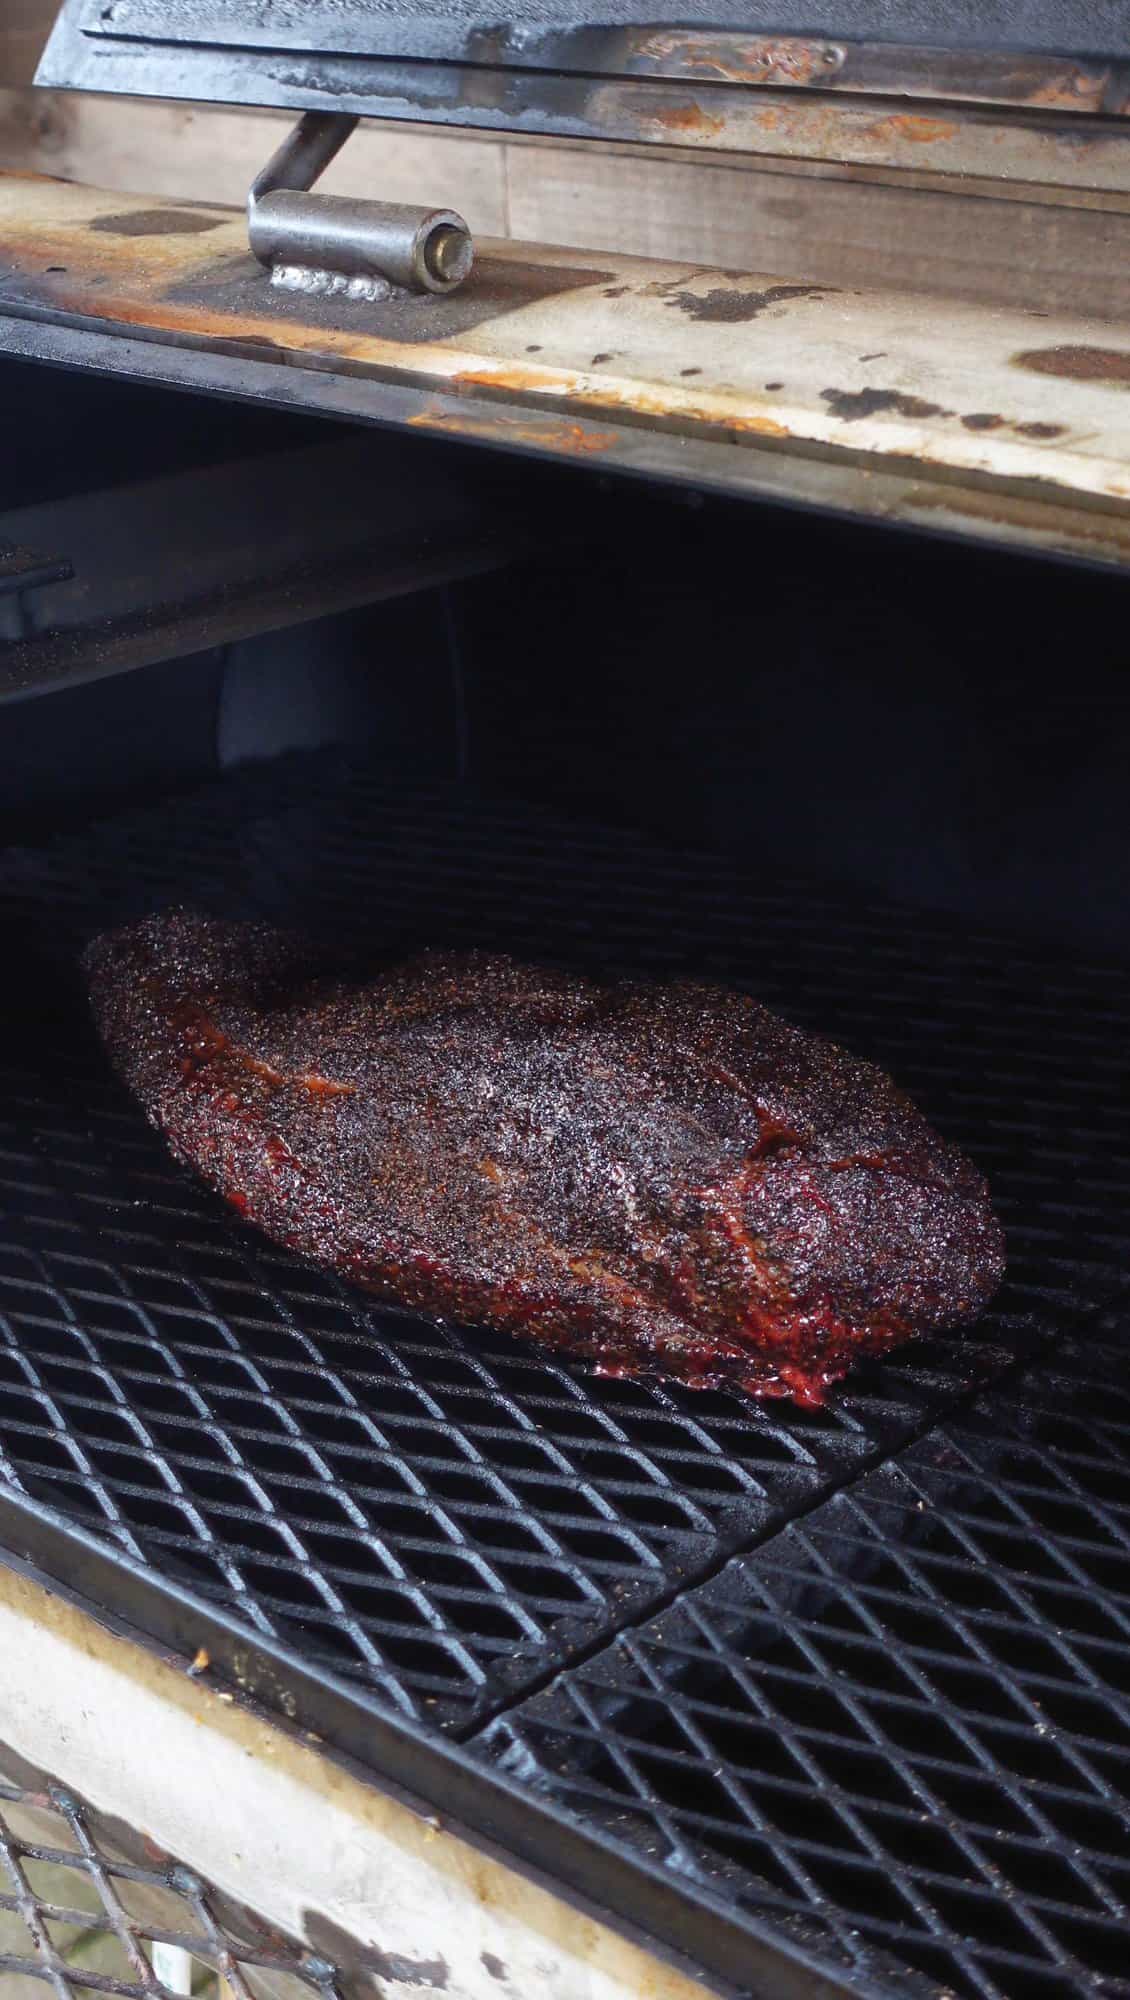
Once it’s on the smoker, leave it alone for the first four hours. That bark needs time to form. After that, start spritzing the surface of the brisket every 45 minutes or so. A 50/50 mix of apple cider vinegar and water works great, but apple juice or even diluted beef broth can do the job too.
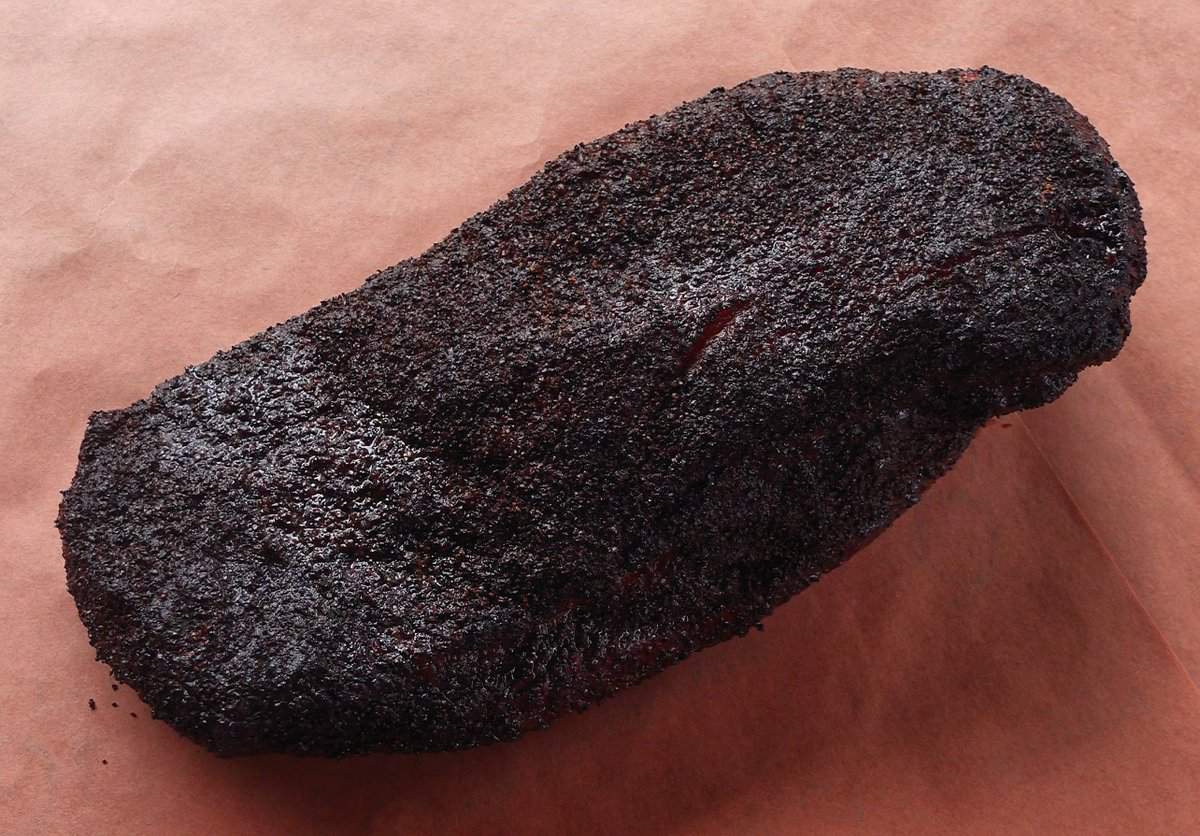
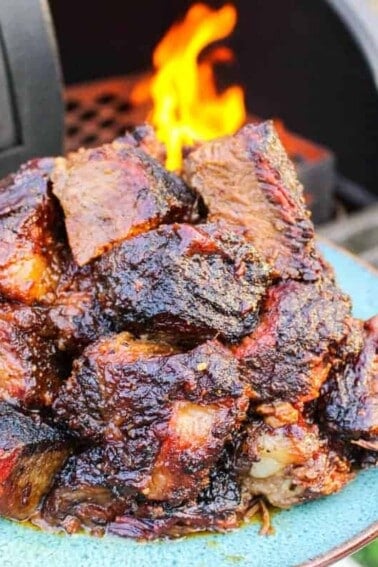
Cook time will vary based on your heat source and the brisket size. But here’s the general flow: keep spritzing until the bark is well developed and you’re seeing a dark, rich color. For me, that’s usually around 170 to 180 degrees internal temp. That’s when it’s time to wrap.
Double Wrap the smoked Brisket
Lay out two full-length sheets of pink butcher paper. If you’re out of paper, aluminum foil works too — that’s the Texas crutch, and it’s a good backup if you’re running behind on time or need to salvage a bark that got away from you.
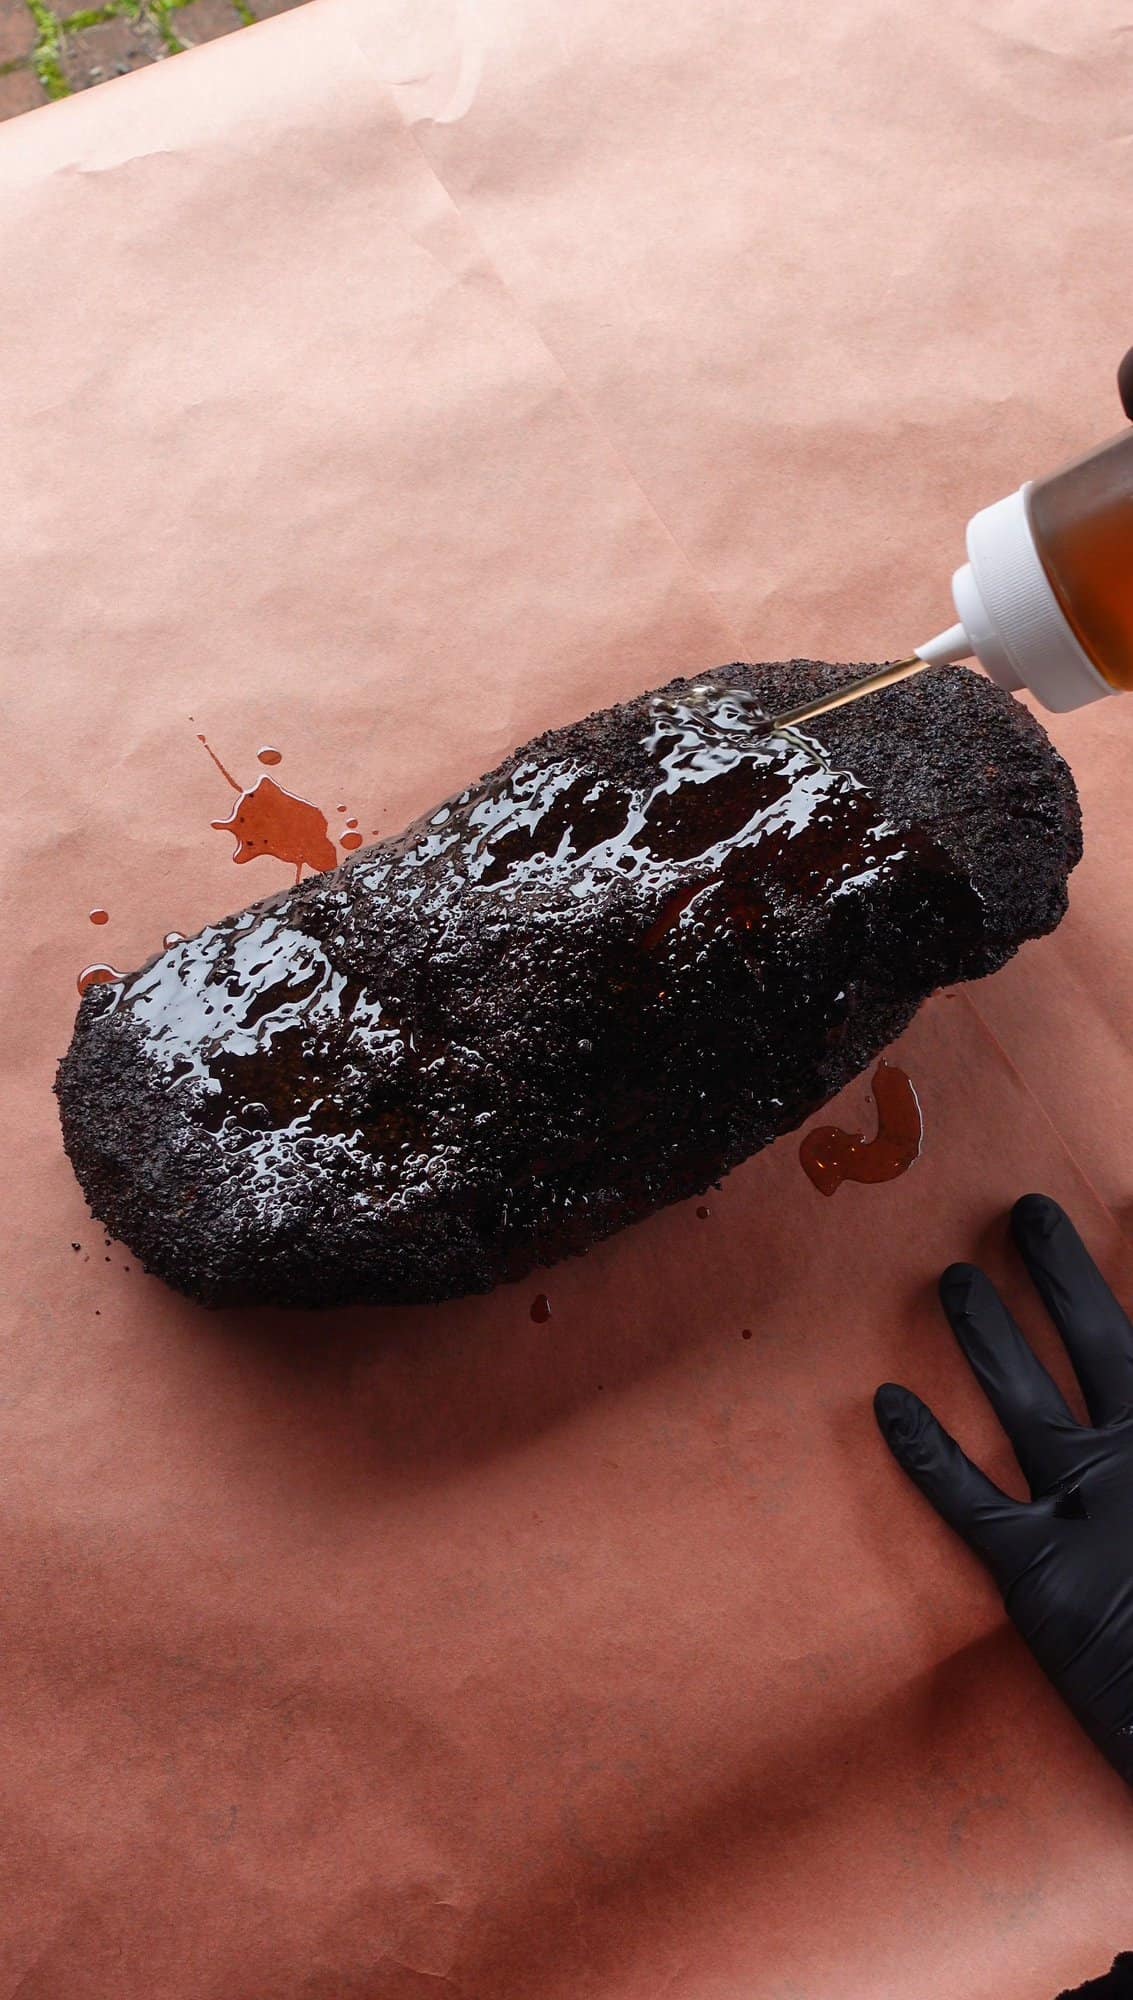
Before wrapping, I pour warmed beef tallow over the top of the brisket. It adds moisture and helps create a rich bark crust. Wrap the brisket tightly with two full rolls, keeping the fat side up. Tuck in the corners to make sure everything is sealed.
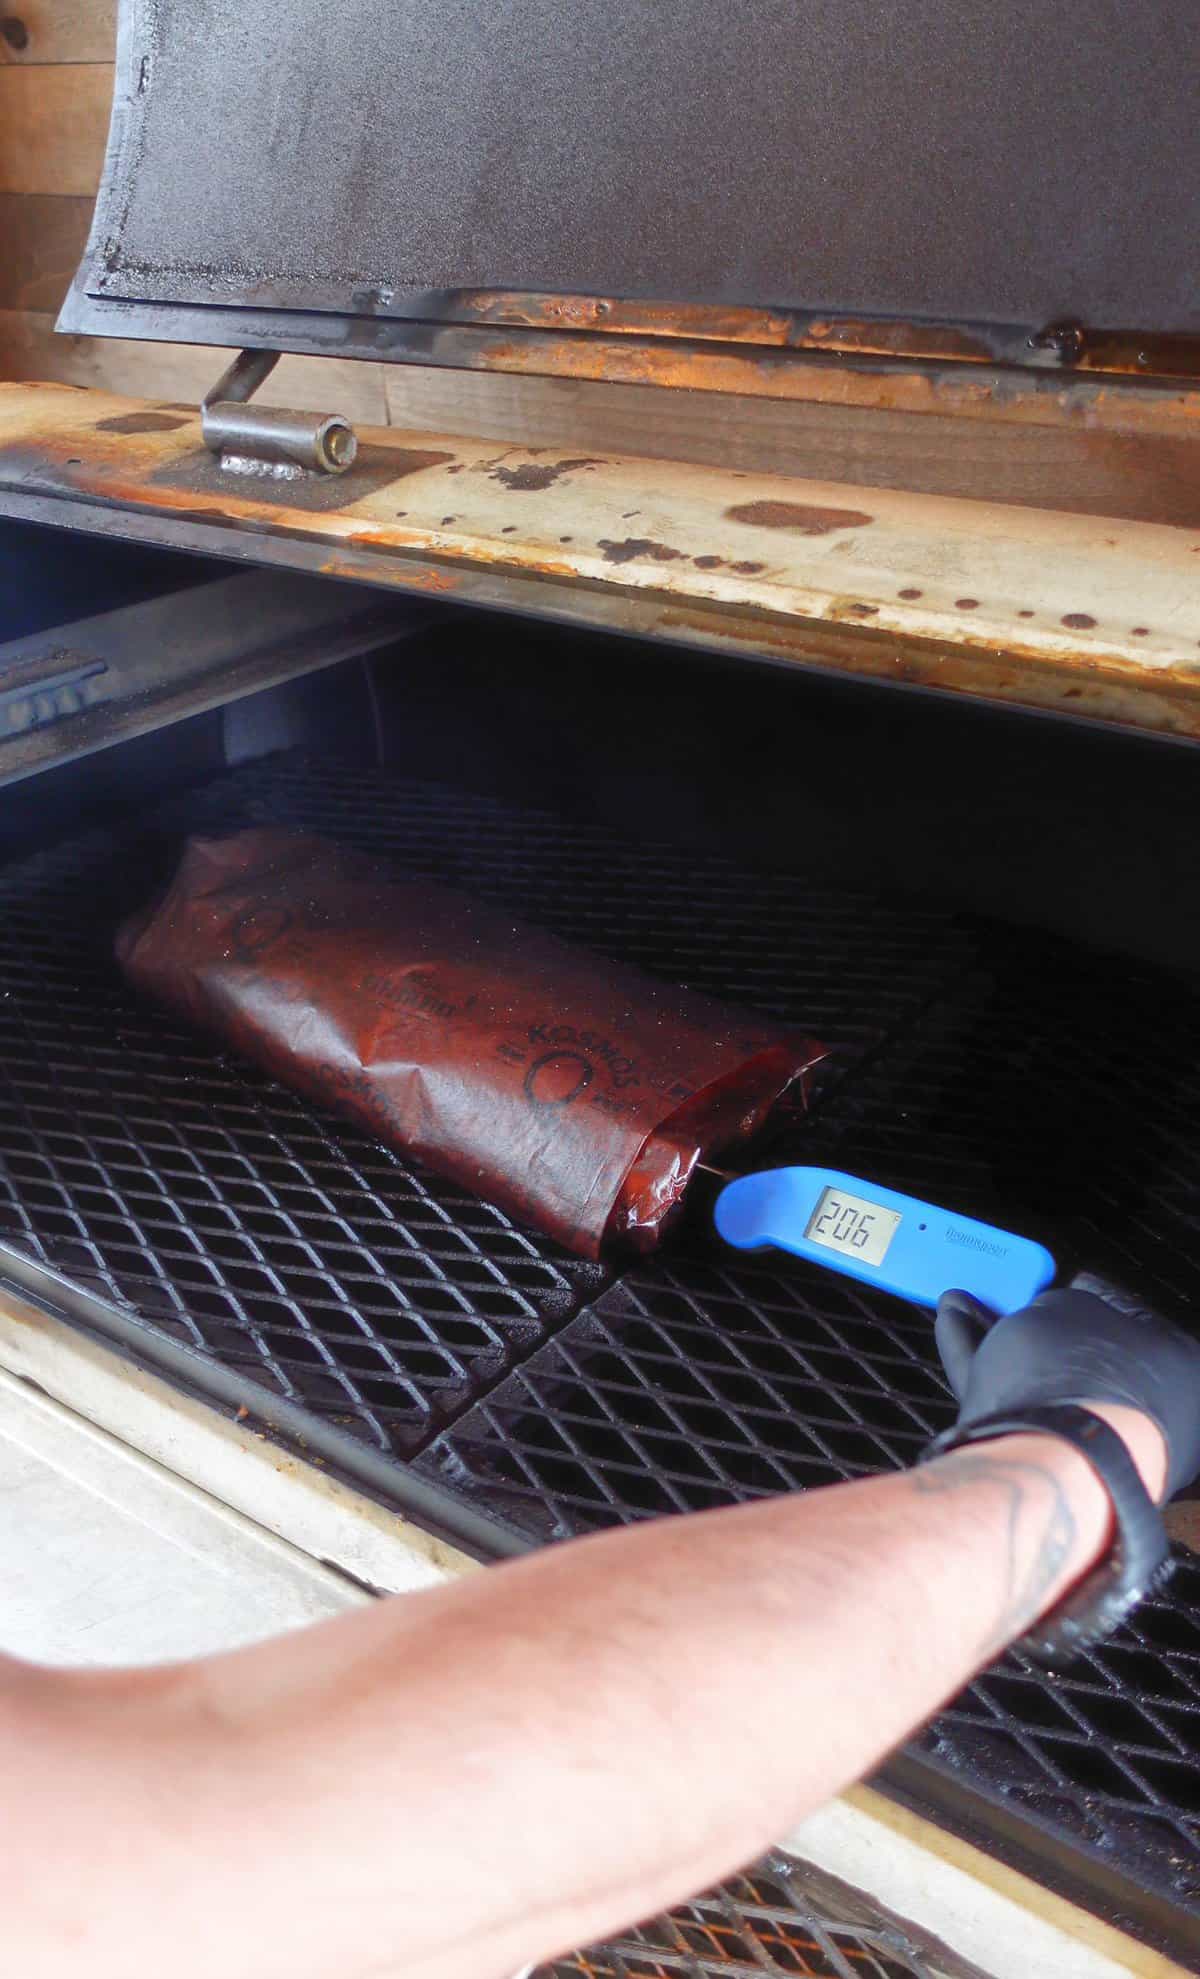
Place the wrapped brisket back in the smoker with the flat side facing the heat source. Keep smoking until your meat thermometer glides into the flat with almost no resistance. That usually happens between 200 and 208 degrees Fahrenheit.
Resting the Brisket (Don’t Skip This)
Once the brisket is probe tender, pull it from the smoker and place brisket on a cutting board or sheet tray to cool at room temperature. Let it rest for about a half hour until the internal temperature of the meat drops to 180 to 185 degrees.
Then transfer it into an empty cooler. I don’t usually add towels unless I need to hold it for a long time. Rest it until the internal temp comes down to around 140 degrees Fahrenheit. That long rest is where the magic happens. The muscle fibers relax, the moisture reabsorbs, and the bark stabilizes. If you skip this step, you’ll end up with a dry brisket and a missed opportunity.
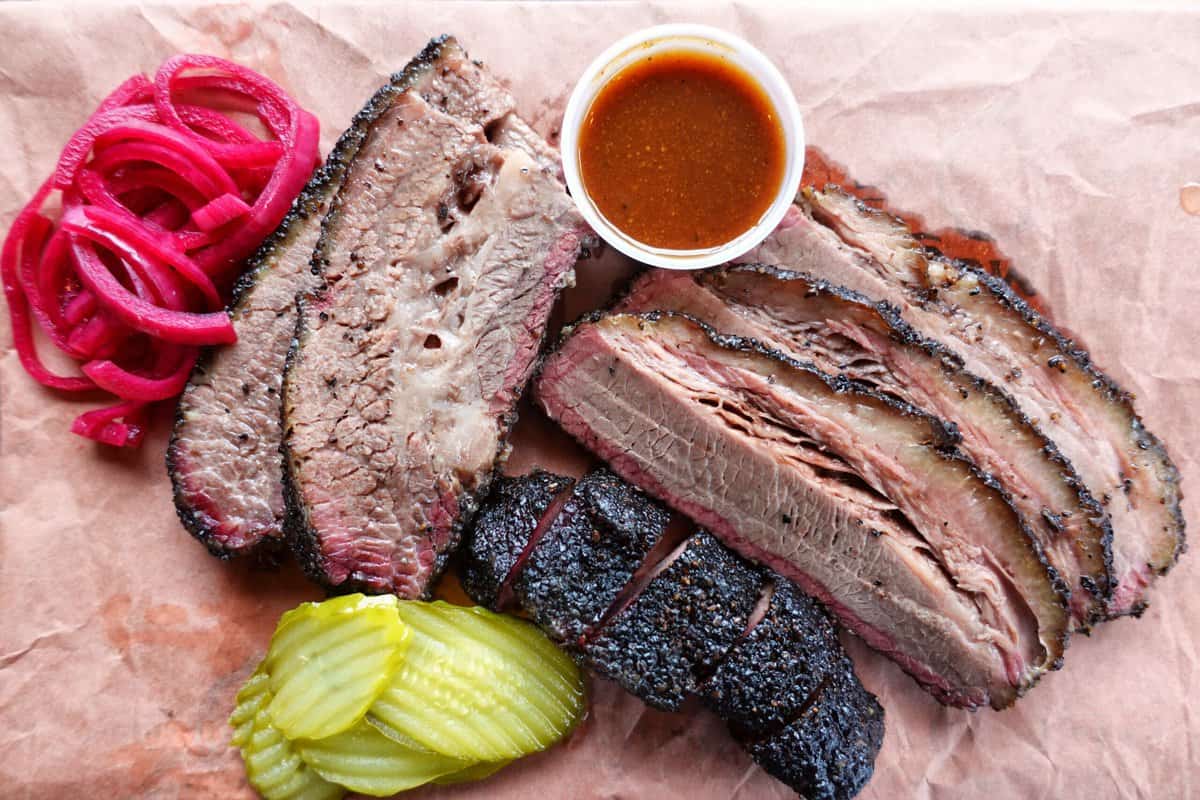
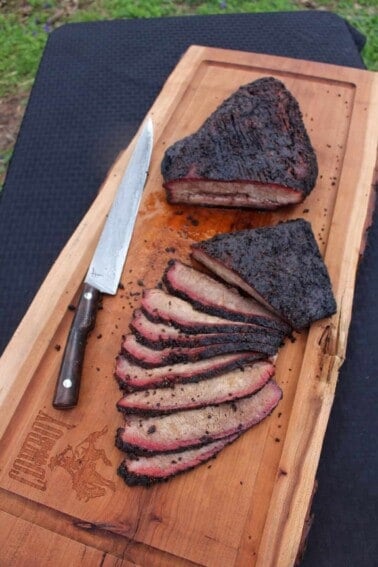
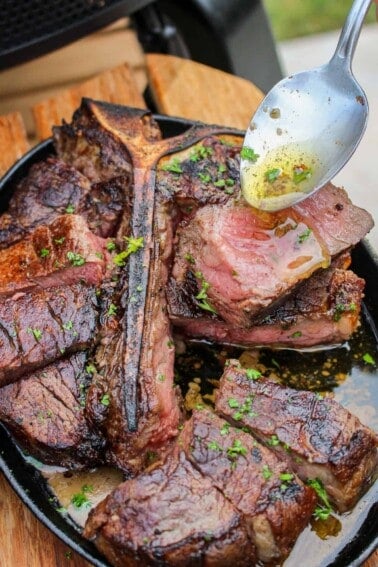
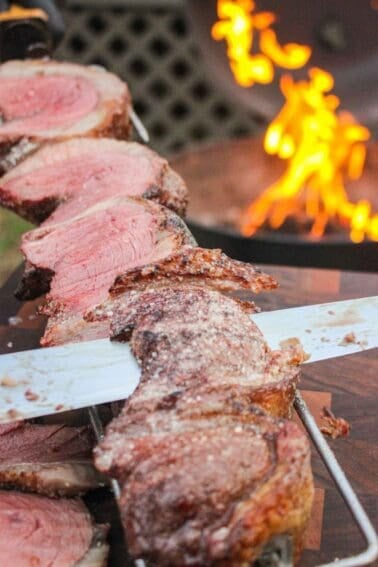
Slicing and Serving
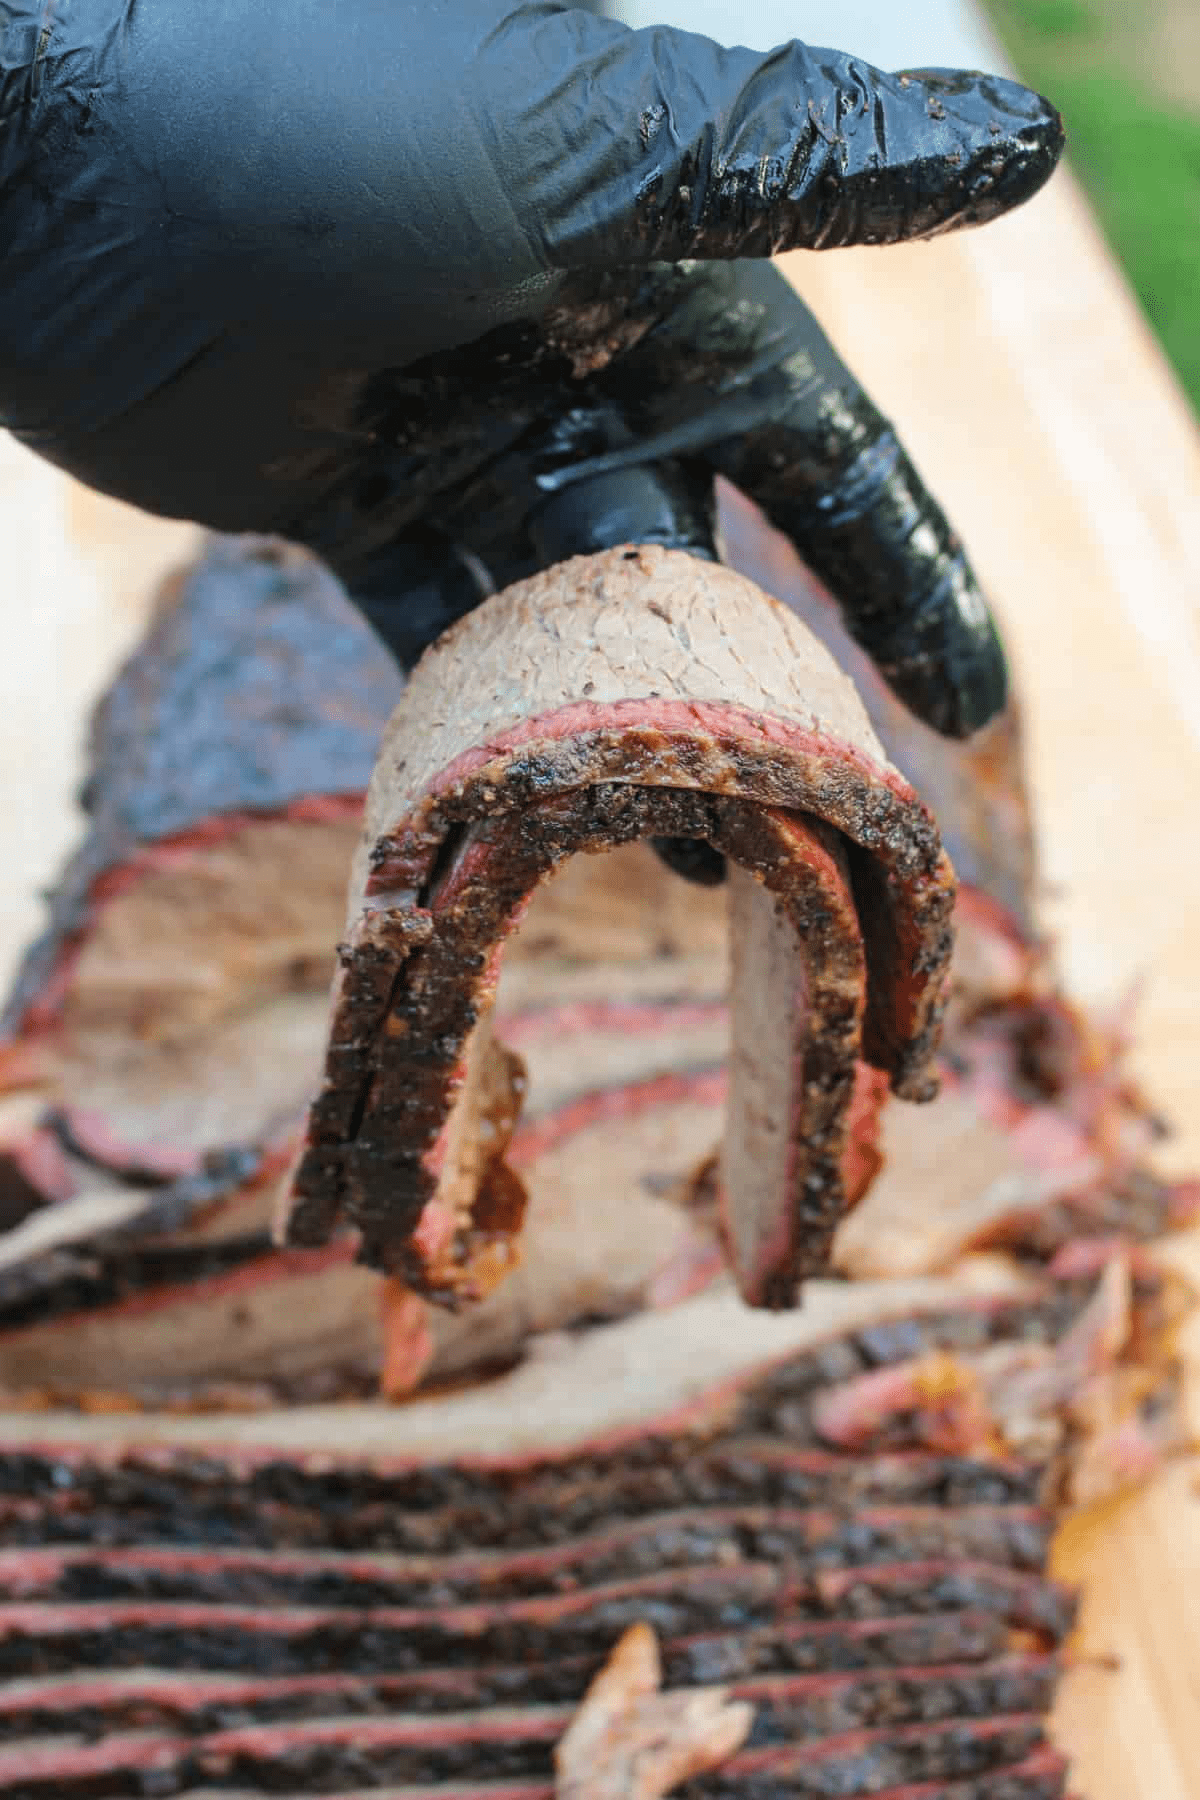
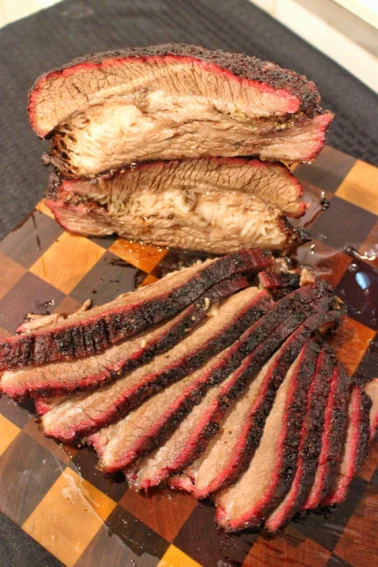
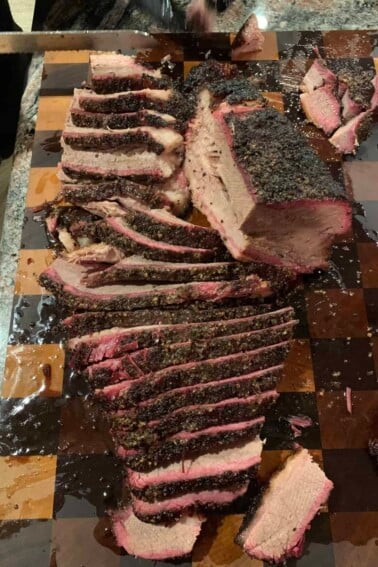
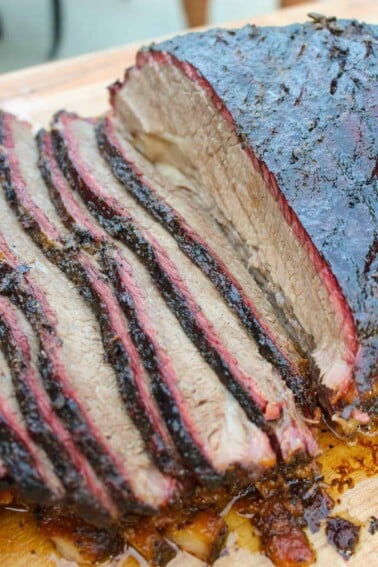
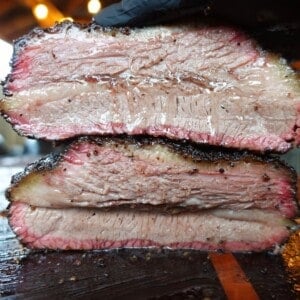
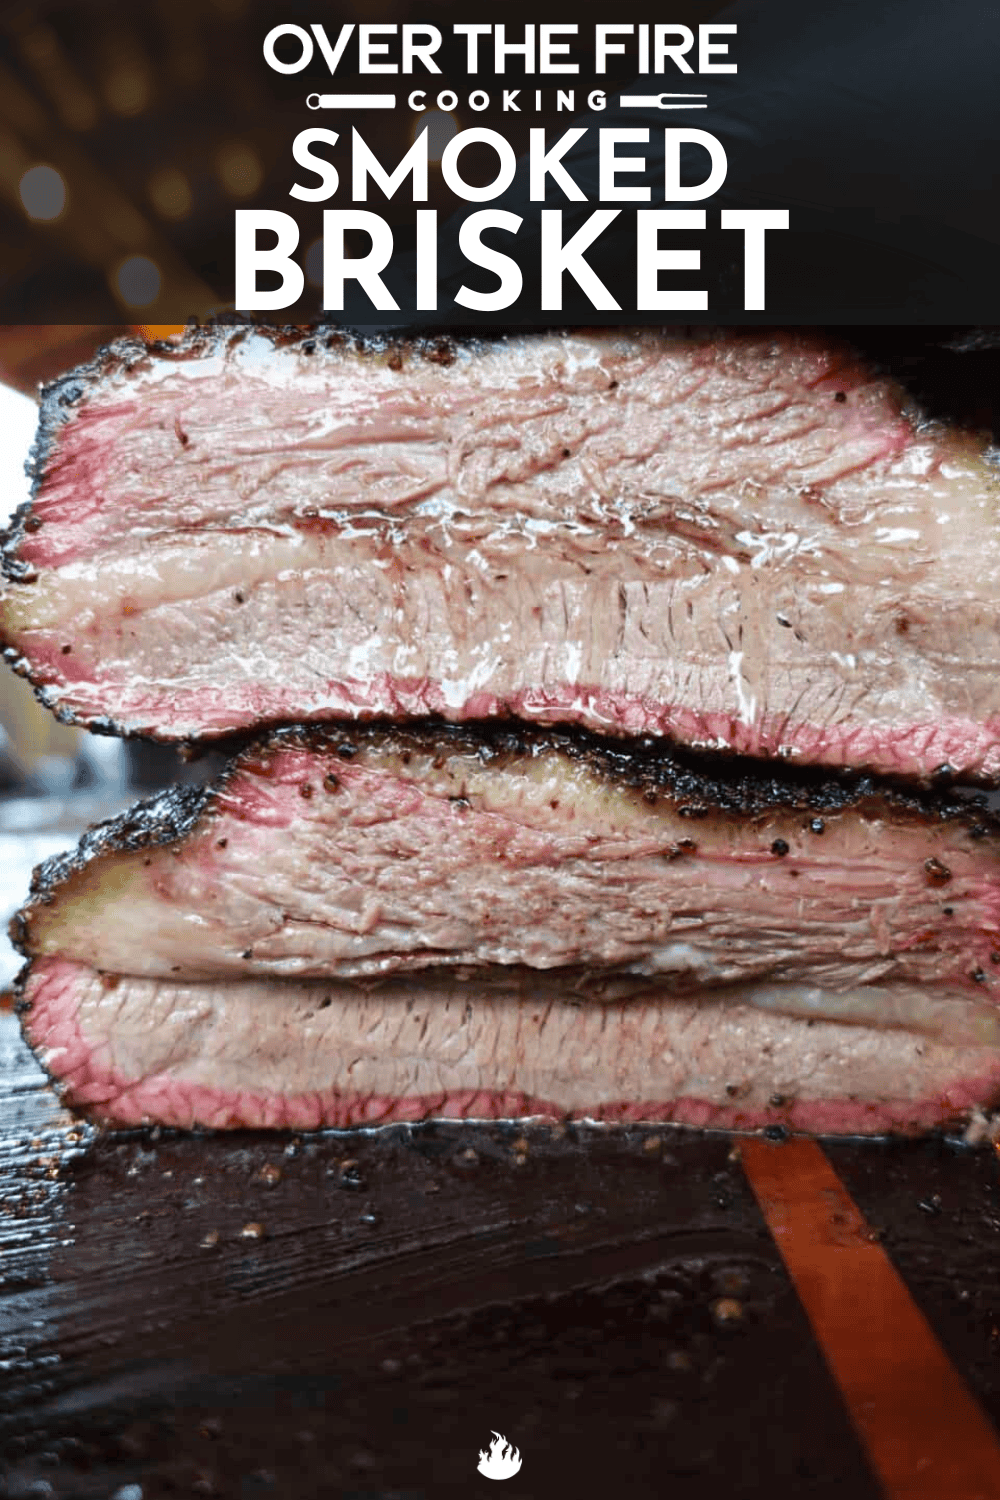
Once rested, unwrap the brisket and place it fat side down on your cutting board. Start slicing across the grain of the flat in quarter-inch slices. When you reach the point — where the muscle fibers shift direction — rotate the brisket 90 degrees and continue slicing. Slightly thicker cuts work best for the point.
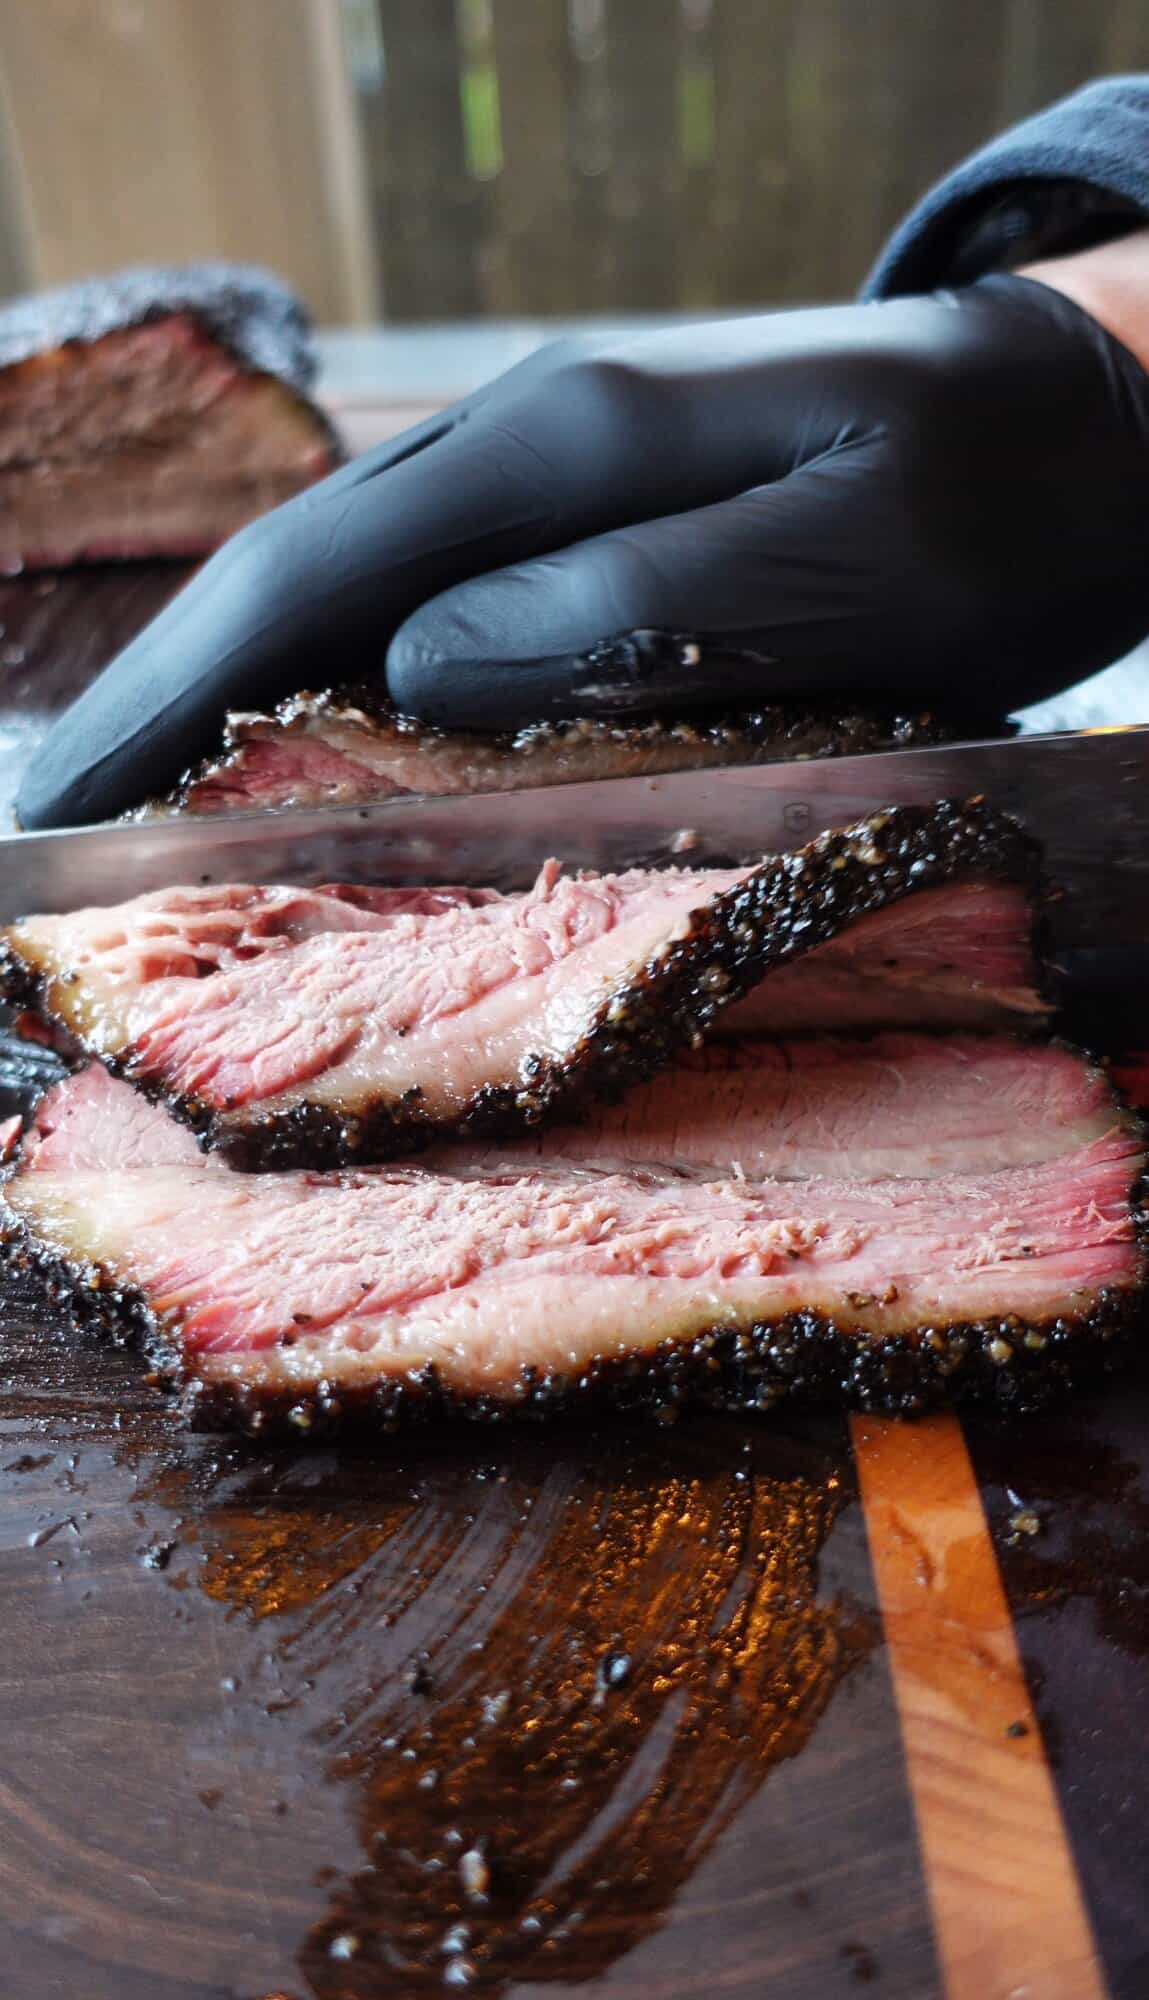
Properly cooked, the beef brisket slices will hold together under their own weight and bend easily. If they fall apart, it’s overcooked. If they resist and feel chewy, it’s undercooked. Learn from each cook and adjust.
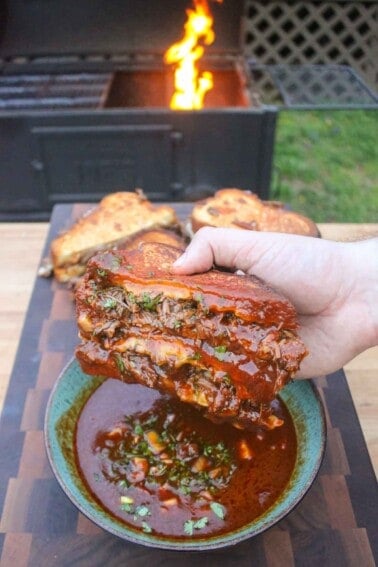
Serve with your favorite barbecue sauce, white bread, or pickled red onions. Two to three slices per guest is usually enough, especially if you’re also serving pork shoulder, sausage, or sides.
Leftovers and Storage
If you somehow have any brisket left, wrap it in foil or transfer it to an airtight container and refrigerate for up to five days. For freezing, vacuum sealing gives you the best results. Reheat slowly — low oven or gentle steam — to preserve that bark and avoid drying it out.
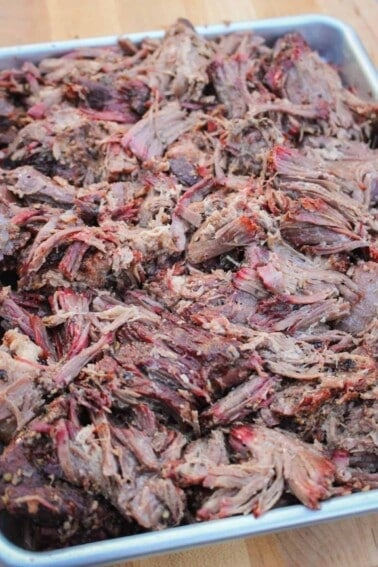
Leftover brisket makes killer burnt ends, brisket breakfast hash, or even tacos. You worked hard for it. Use every piece.
A FINAL WORD ON BEEF BRISKET
There’s no shortcut to great brisket, but it doesn’t have to be a mystery either. Learn your smoker, trust your senses, and don’t obsess over numbers. Feel the resistance. Watch the surface of the brisket. Smell the wood. And remember, every brisket teaches you something. That’s the beauty of it.

Next time, try this same method on a pork shoulder or give one of my hot and fast brisket cooks a go. Whether you’re running a long cook or testing new rubs, there’s always a new variable to dial in.
Good luck and happy smoking!
FAQs for Smoked Beef Brisket
It depends on the size of the brisket, your smoker, and how steady you keep your heat — but a good rule of thumb is 1 to 1.25 hours per pound at 250F. That means a 14-pound full packer brisket could take anywhere from 12 to 16 hours. But here’s the deal: don’t cook by time alone. Cook by feel. When your temperature probe slides into the flat like warm butter, it’s ready.
Both work, but I recommend pink butcher paper for the best bark. It breathes enough to keep your bark crusty while still protecting the meat. Aluminum foil (aka the Texas Crutch) traps steam and speeds up the cook, but it can soften your bark and give the meat more of a pot-roast vibe. If you’re in a pinch or running behind, foil gets the job done. But for best results, go with the paper.
There’s no magic number, but most briskets finish somewhere between 200F and 208F in the thickest part of the flat. The key is not the number — it’s the feel. Use a meat thermometer and check multiple spots. When it goes in with little to no resistance, like poking softened butter, that brisket is done.
More Brisket

Get stoked for life
HONEY INFUSED. FLAME PERFECTED.
- HONEY SWEETENED
- CAYENNE KICK
- SMALL BATCH
Smoked Brisket
Ingredients
- 1 whole packer brisket 12-14lb
- Yellow mustard for the binder
- 1 cup 16 mesh black pepper
- ¼ cup kosher salt
- 4 tsp granulated garlic
- Pink butcher paper
- 1 1/2 cups beef tallow warmed up to liquify
Spritz
- 1 cup apple cider vinegar
- 1 cup water
Instructions
Prep the Smoker
- Preheat your smoker to 250F – 275F degrees.
- Start with smaller pieces of dry wood when first and a couple handfuls of lump charcoal. Be sure to stack each layer perpendicular to each other to allow for proper airflow. If you start with two logs running the length of the fire box in the direction in which the air flows through the smoker, and put the lump charcoal in between these two logs, you will encourage a great bed of coals and no restricted airflow. You can use a fire starter or torch to help get your fire going. Whatever you do, don’t use lighter fluid. Maintain these temps through the entire cook.
Prep the Brisket
- Trim the excess fat from the bottom (flat) and top (fat cap) of the brisket. Being careful not to gouge the meat or fat while leaving ¼ inch of fat evenly across the entire fat cap.
- Starting with the fat cap down, apply a thin layer of yellow mustard to help the seasonings adhere to the surface.
- Thoroughly mix together the salt, pepper and granulated garlic and apply a very heavy and even layer including all 4 sides of the brisket.
- Flip the brisket over so that the fat cap is facing up and repeat the process of mustard then seasoning. (You can do this step the night before. Just cover the brisket in an airtight container or wrap in plastic wrap).
Smoke the Brisket
- Place the brisket fat cap up inside your smoker with the point end facing the heat source. Close the lid and do not open it for the first 4 hours.
- After the first 4 hours, mix the apple cider vinegar and water in a spray bottle, and spray the edges of the brisket but avoid excess spray on the fat.
- Do this once every hour or so until you have developed a level of bark that you are happy with. Generally, around 170-180F internal temp.
- Once you are happy with the color and consistency of the bark, roll out enough butcher paper to wrap the brisket up two full rotations and lay it flat on a prepared cooking surface.
Wrap the Brisket
- Remove the brisket from the smoker and place on your butcher paper roughly 16” from one end. Pour the liquified beef tallow all over the brisket completely covering all surfaces.
- Wrap the brisket tightly in the paper being sure to pull the brisket in tight and tuck in the corners after each flip.
- Wrap the brisket in two full rotations of paper being sure that the fat side is still up before placing it back in the smoker.
Continue to Smoke
- Put the brisket back in the smoker with the flat side pointing towards the heat source.
- Continue to cook until you can insert a thermometer pen probe with very little resistance.
- Be sure to check the thickest part of the flat from the front, not the side or the top.
- The temp will range from 200°-208° so be sure to probe for tenderness regularly during these temp ranges.
Remove and Rest
- When the probe goes into the flat with little resistance after checking multiple spots, remove the brisket from the smoker, leaving it wrapped. Let it rest on the kitchen counter for 30-40 minutes, or until the internal temp hits between 180-185F internal temp in the flat.
- Then place the brisket in a cooler and close the lid letting the brisket come down in temp slowly until the internal temp hits 140°. This can take several hours.
Slice and Serve
- After the brisket hits 140F, you can remove it from the cooler and place it on a larger cutting board while you remove the pink butcher paper.
- Starting with the flat, slice ¼” slices with your knife perpendicular to the brisket going from the flat to the point, until you have about 1/3 point and 2/3rds flat exposed.
- Then rotate the remaining point end 90 degrees and continue slicing making slightly thicker slices.
- Serve 2-3 slices per guest pairing with pickled red onions, rolls or white bread and your favorite BBQ sauce. Enjoy!


I haven’t used your techniques yet, but I have smoked a lot of meats and your info and detail is great!
Thanks for sharing.
Man, I made this just like you suggested. Awesome!!! The results were exactly as you have posted in the recipe. Main thing I can say to anyone else is, trust the process. I made this for Kentucky Derby party. Thanks for the recipe.
Thankyou for this. I appreciate you
Wow!! Thank you, Nick, for sharing all your pro tips!! I learned a LOT in this article!! I may have to take over my hubby’s smoker and give this a try myself!!
Thanks Nick – followed your advice for a perfect outcome on my Highlander.
16-1/2 hour cook, but when you end up with perfect brisket…who’s counting?😉
First time making a brisket by following your recipe. IT WAS AMAZING! 6.5kg Angus brisket, 16 hours on the Big Green Egg, +- 4 hours rest (in the oven to get me some more time for dinner time). 20 hours of work and within 10 minutes everything was gone! DELICIOUS! Thank you so much for your tips/tricks!
Great detail in this post, thanks! I do wonder with everyone saying 16-20 hours, when do you all start your cook? I feel like it should be late the night before. Could use some feedback on this.
Yes the night before seems to be a classic way to make brisket. It can be an all-nighter!
I truly want to thank you for this write up on how to make a brisket! I started making brisket this year due to me loving it sooo much! I reside in Texas now and this cut of meat is my fav. I have tried smoked 5 briskets with different variations of methods like I am searching for something. I have a weber kettle that I converted to a smoker. This write up perfectly explains the science and debunks the methods that I used before. You debunk and explained why. I used the foul boat method previously…now I am sold on the butcher paper. I used this write up to smoke a brisket and let me tell you….it was the best brisket I ever had……well….of the 5 I have made by my hands. Again thank you Sir!
after watching several videos on you tube…… found this one. it is spot on for a delicious smoked brisket. easy to follow. !!!
she’s on the smoker now… can’t wait!
1 cup of fresh ground pepper would take FOREVER to grind by hand
suggest screwing an electric drill to the shaft of a pepper mill and let er rip
heaps-o-pepper in no time. and wrists don’t ache!
never done it before but i will try honey cause i like a little sweetness it will be something different for newyears eve dinner